Getting Started
Guide to installing and performing initial setup of the Petnow Android SDK.
Overview
This guide walks you step by step through installing the Petnow Android SDK into your project and performing the initial setup.
Prerequisites
Before you begin, make sure you have the following ready:
- A project targeting Android API 28 (Android 9.0) or higher
- compileSdk 34 or higher
- Java 17 or higher
- Kotlin 1.9 or higher
- A Petnow API key — issue one from the Petify Console (or contact support@petnow.io)
Step 1: Install the SDK
The Petnow Android SDK is distributed through AWS CodeArtifact.
Install the AWS CLI
Install the AWS CLI from the following link: https://docs.aws.amazon.com/cli/latest/userguide/getting-started-install.html
Issue Credentials from the Petify Console
Issue your AWS CodeArtifact credentials from My Page in the Petify Console, and set the environment variables using the provided values. (See the Petify Console doc for sign-up, payment-method registration, and key issuance.)
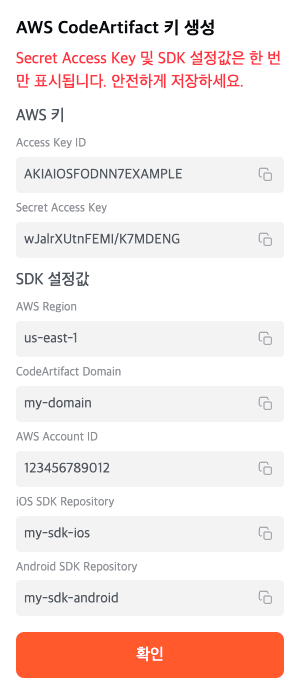
export AWS_ACCESS_KEY_ID=<from Petify Console>
export AWS_SECRET_ACCESS_KEY=<from Petify Console>
export AWS_DEFAULT_REGION=<from Petify Console>
export PETNOW_CODEARTIFACT_DOMAIN=<from Petify Console>
export PETNOW_AWS_ACCOUNT_ID=<from Petify Console>
export PETNOW_ANDROID_SDK_REPOSITORY=<from Petify Console>Add the Petnow Maven Repository
Derive the repository URL and authentication token from your credentials:
export CODEARTIFACT_URL=$(aws codeartifact get-repository-endpoint \
  --domain $PETNOW_CODEARTIFACT_DOMAIN \
  --domain-owner $PETNOW_AWS_ACCOUNT_ID \
  --repository $PETNOW_ANDROID_SDK_REPOSITORY \
  --region $AWS_DEFAULT_REGION \
  --format maven \
  --query repositoryEndpoint \
  --output text)

export CODEARTIFACT_AUTH_TOKEN=$(aws codeartifact get-authorization-token \
  --domain $PETNOW_CODEARTIFACT_DOMAIN \
  --domain-owner $PETNOW_AWS_ACCOUNT_ID \
  --region $AWS_DEFAULT_REGION \
  --query authorizationToken \
  --output text)
Token expiration: Re-run both commands every 12 hours, or whenever a Gradle sync fails with an authentication error. In CI/automated environments, inject the credentials as secrets and refresh the token during the build — see the AWS CodeArtifact authentication tokens docs.
Add the Petnow Maven repository to your project's settings.gradle.kts or root build.gradle.kts file:
dependencyResolutionManagement {
    repositories {
        google()
        mavenCentral()
        maven {
            name = "CodeArtifact"
            url = uri(System.getenv("CODEARTIFACT_URL") ?: "YOUR_REPOSITORY_URL")
            credentials {
                username = "aws"
                password = System.getenv("CODEARTIFACT_AUTH_TOKEN") ?: "YOUR_AUTH_TOKEN"
            }
        }
    }
}
Add the Dependency
Add the following dependency to your app's build.gradle.kts file:
dependencies {
    // Petnow SDK
    implementation("io.petnow:ui:1.4.0")
}
Using the UI module does not require a separate api-client dependency. If you need to call server APIs, handle them directly from your app server.
Step 2: Configure the Project
Configure AndroidManifest.xml
Add the following permissions and settings to your app's AndroidManifest.xml file:
<?xml version="1.0" encoding="utf-8"?>
<manifest xmlns:android="http://schemas.android.com/apk/res/android"
    xmlns:tools="http://schemas.android.com/tools">

    <!-- Internet permission (required) -->
    <uses-permission android:name="android.permission.INTERNET"/>
    <!-- Camera permission (required) -->
    <uses-permission android:name="android.permission.CAMERA"/>

    <application
        android:largeHeap="true"
        ... >
        ...
    </application>

</manifest>| Setting | Description |
|---|---|
INTERNET | Required for API communication and license verification |
CAMERA | Required for camera preview and detection |
largeHeap="true" | Recommended for optimal performance during image processing and detection |
The host requests the camera permission
The recommended path, CameraView + CameraController, does not request the camera permission automatically. Declare the CAMERA permission above and request the runtime permission yourself before starting a session. (Only the legacy PetnowCameraFragment requests it automatically.)
Import the Modules
import io.petnow.ui.CameraController
import io.petnow.ui.CameraView
import io.petnow.ui.config.LicenseInfo
import io.petnow.callback.PetnowCameraDetectionListenerV2
Step 3: Understand License and Detection Configuration
As of 1.4.0, there is no global initialization (PetnowUiClient.initialize()). License and detection configuration are passed per camera session.
- License: Create a
LicenseInfo(apiKey, isDebugMode)and pass it to theCameraControllerconstructor. (There is no separate global initialization call.) - Detection configuration: Create a
DetectionConfigurationand pass it toinitializeCamera()when starting the session.
import io.petnow.ui.CameraController
import io.petnow.ui.config.LicenseInfo

// The license is passed when creating the CameraController.
val license = LicenseInfo(apiKey = "YOUR_API_KEY", isDebugMode = false)
val controller = CameraController(
    context,                     // Application/Activity Context
    license,
    coroutineScope,              // A CoroutineScope valid for the duration of the session
)
apiKey is used for monitoring/metrics. On Android, no client-side license verification is performed (the camera works even if the key is missing or incorrect, but metrics are not aggregated). For key issuance, contact support@petnow.io.
Detection Configuration (DetectionConfiguration)
import io.petnow.ui.config.DetectionConfiguration
import io.petnow.ui.config.DetectionPurpose
import io.petnow.ui.config.PetSpecies

// For dog profile registration
val configuration = DetectionConfiguration(
    species = PetSpecies.DOG,
    purpose = DetectionPurpose.PET_PROFILE_REGISTRATION,
    enableFakeDetection = true,
)
This configuration is passed to controller.initializeCamera(configuration, captureSessionId) when starting the session. The full flow is covered in Basic Usage.
Parameter Reference
| Parameter | Description |
|---|---|
species | The pet species. Determines the detection pipeline. |
purpose | The capture purpose. The number of required images depends on the purpose. |
enableFakeDetection | Whether to enable detection of fake images (photos, videos, etc.) |
difficultyMode | (Optional) Difficulty level. If not specified, the server/default value (NORMAL) is applied. |
purpose options:
DetectionPurpose.PET_PROFILE_REGISTRATION- Profile registrationDetectionPurpose.PET_IDENTIFICATION- IdentificationDetectionPurpose.PET_VERIFICATION- Verification
species options:
PetSpecies.DOG- Dog (nose detection)PetSpecies.CAT- Cat (face detection)
Create a Capture Session
Required: Before starting a camera session, you must create a capture session on your server and obtain a captureSessionId.
import java.util.UUID

lifecycleScope.launch {
    // Obtain the captureSessionId from your server
    // (your server calls createCaptureSession of the Petnow Server API)
    val captureSessionId: UUID = yourServerApi.createCaptureSession(
        species = "DOG",
        purpose = "PET_PROFILE_REGISTRATION"
    )

    // Pass the captureSessionId when navigating to the camera screen
    navigateToCameraScreen(captureSessionId)
}
Server API: The captureSessionId is created on your server through the Petnow Server API. It is not created directly on the client.
Creating the capture session is your app server's responsibility (the client only uses the issued captureSessionId). The petId requirement depends on the purpose (required for registration/verification, not required for identification). For the creation parameters, the petId requirement, and the full server flow through result-image upload, see Server API – Biometric.
For details on how to pass the captureSessionId, see the UI Module Overview.
Step 4: Verify the Installation
To verify that the SDK is installed correctly, build and run your app. If the dependencies were resolved successfully, the following code compiles and lets you check whether the device supports the camera.
import io.petnow.ui.camera.getCameraInfo

// Check whether the device supports the camera (there is no global initialization call)
val cameraInfo = context.getCameraInfo()
Log.d("PetnowSDK", "supported=${cameraInfo.isSupportedDevice}, front=${cameraInfo.isFrontCameraSupported}")
Troubleshooting
Package Not Found
Symptom: Gradle sync fails, dependency not found
Solution:
-
Verify CodeArtifact authentication
# Check the environment variables echo $CODEARTIFACT_URL echo $CODEARTIFACT_AUTH_TOKEN -
Refresh the token
- The CodeArtifact token expires after 12 hours
- Re-issue the token with the following command:
export CODEARTIFACT_AUTH_TOKEN=$(aws codeartifact get-authorization-token \ --domain $PETNOW_CODEARTIFACT_DOMAIN \ --domain-owner $PETNOW_AWS_ACCOUNT_ID \ --region $AWS_DEFAULT_REGION \ --query authorizationToken \ --output text) -
Clear the Gradle cache
./gradlew clean
./gradlew --refresh-dependencies
API Key / Metrics
Symptom: Capture works, but metrics are not aggregated in the Petify Console
Solution:
- Android does not perform client-side license verification, so key issues surface in metrics aggregation rather than in camera operation.
- Verify that the key passed to
LicenseInfo(apiKey = ...)is correct - Contact support@petnow.io
Camera Permission Error
Symptom: The camera does not appear, or the permission request fails
Solution:
- Verify that the
CAMERApermission is declared inAndroidManifest.xml - On the
CameraView+CameraControllerpath, the host must request the runtime camera permission before starting a session (only the legacyPetnowCameraFragmentrequests it automatically) - If the user denied the permission, guide them to grant it manually in Settings
OutOfMemoryError
Symptom: Out-of-memory error during image processing
Solution:
- Verify that
android:largeHeap="true"is added toAndroidManifest.xml - Clear unnecessary image caches
Next Steps
Installation and setup are complete! You're now ready to use the SDK.
- UI Module Overview - Understand the UI module structure
- Basic Usage - Integrate the camera UI
Support
If you run into any issues during installation, contact support@petnow.io.