Getting Started
Guide to installing and initially configuring the Petnow iOS SDK.
Overview
This guide walks you through installing the Petnow iOS SDK into your project and performing the initial setup, step by step.
Prerequisites
Before you begin, make sure you have the following ready:
- An Xcode project targeting iOS 16.0 or later
- Xcode 16.0 or later
- A Petnow API key — issue one from the Petify Console (or contact support@petnow.io)
Step 1: Install the SDK
The Petnow iOS SDK is distributed via AWS CodeArtifact.
Install the AWS CLI
Install the AWS CLI from the following link: https://docs.aws.amazon.com/cli/latest/userguide/getting-started-install.html
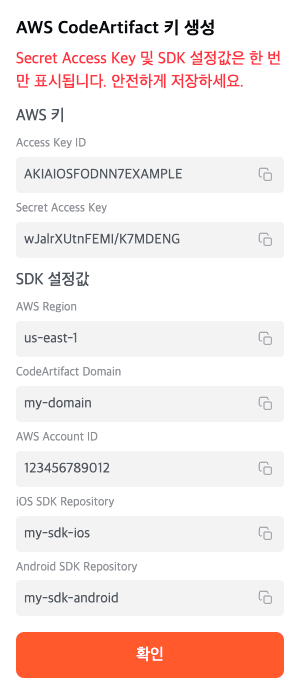
Issue credentials from the Petify Console
Issue AWS CodeArtifact credentials from My Page in the Petify Console, and set the environment variables with the provided values. (See the Petify Console doc for sign-up, payment-method registration, and key issuance.)
export AWS_ACCESS_KEY_ID=<from Petify Console>
export AWS_SECRET_ACCESS_KEY=<from Petify Console>
export AWS_DEFAULT_REGION=<from Petify Console>
export PETNOW_CODEARTIFACT_DOMAIN=<from Petify Console>
export PETNOW_AWS_ACCOUNT_ID=<from Petify Console>
export PETNOW_IOS_SDK_REPOSITORY=<from Petify Console>Swift Package Manager (AWS CodeArtifact)
The iOS SDK is installed via Swift Package Manager (SPM). CocoaPods support is planned.
Choose one of the following based on your project type:
Option A: Package.swift project
For a project that has a Package.swift file, you only need to run the following commands:
- Move to the project root directory:
cd /path/to/your-project # the directory containing Package.swift- Log in to AWS CodeArtifact:
aws codeartifact login --tool swift \
  --domain $PETNOW_CODEARTIFACT_DOMAIN \
  --domain-owner $PETNOW_AWS_ACCOUNT_ID \
--repository $PETNOW_IOS_SDK_REPOSITORY- Confirm success:
# Output on success:
Successfully configured credentials for codeartifact-DOMAIN-ACCOUNT_ID-REPOSITORY

# Check the registry file:
cat ~/.swiftpm/configuration/registries.jsonNote: The authentication token is valid for 12 hours. When it expires, run the login command again. In CI/automated environments, inject the credentials as secrets and refresh the token during the build — see the AWS CodeArtifact authentication tokens docs.
Option B: Xcode Workspace
Adding the package in Xcode
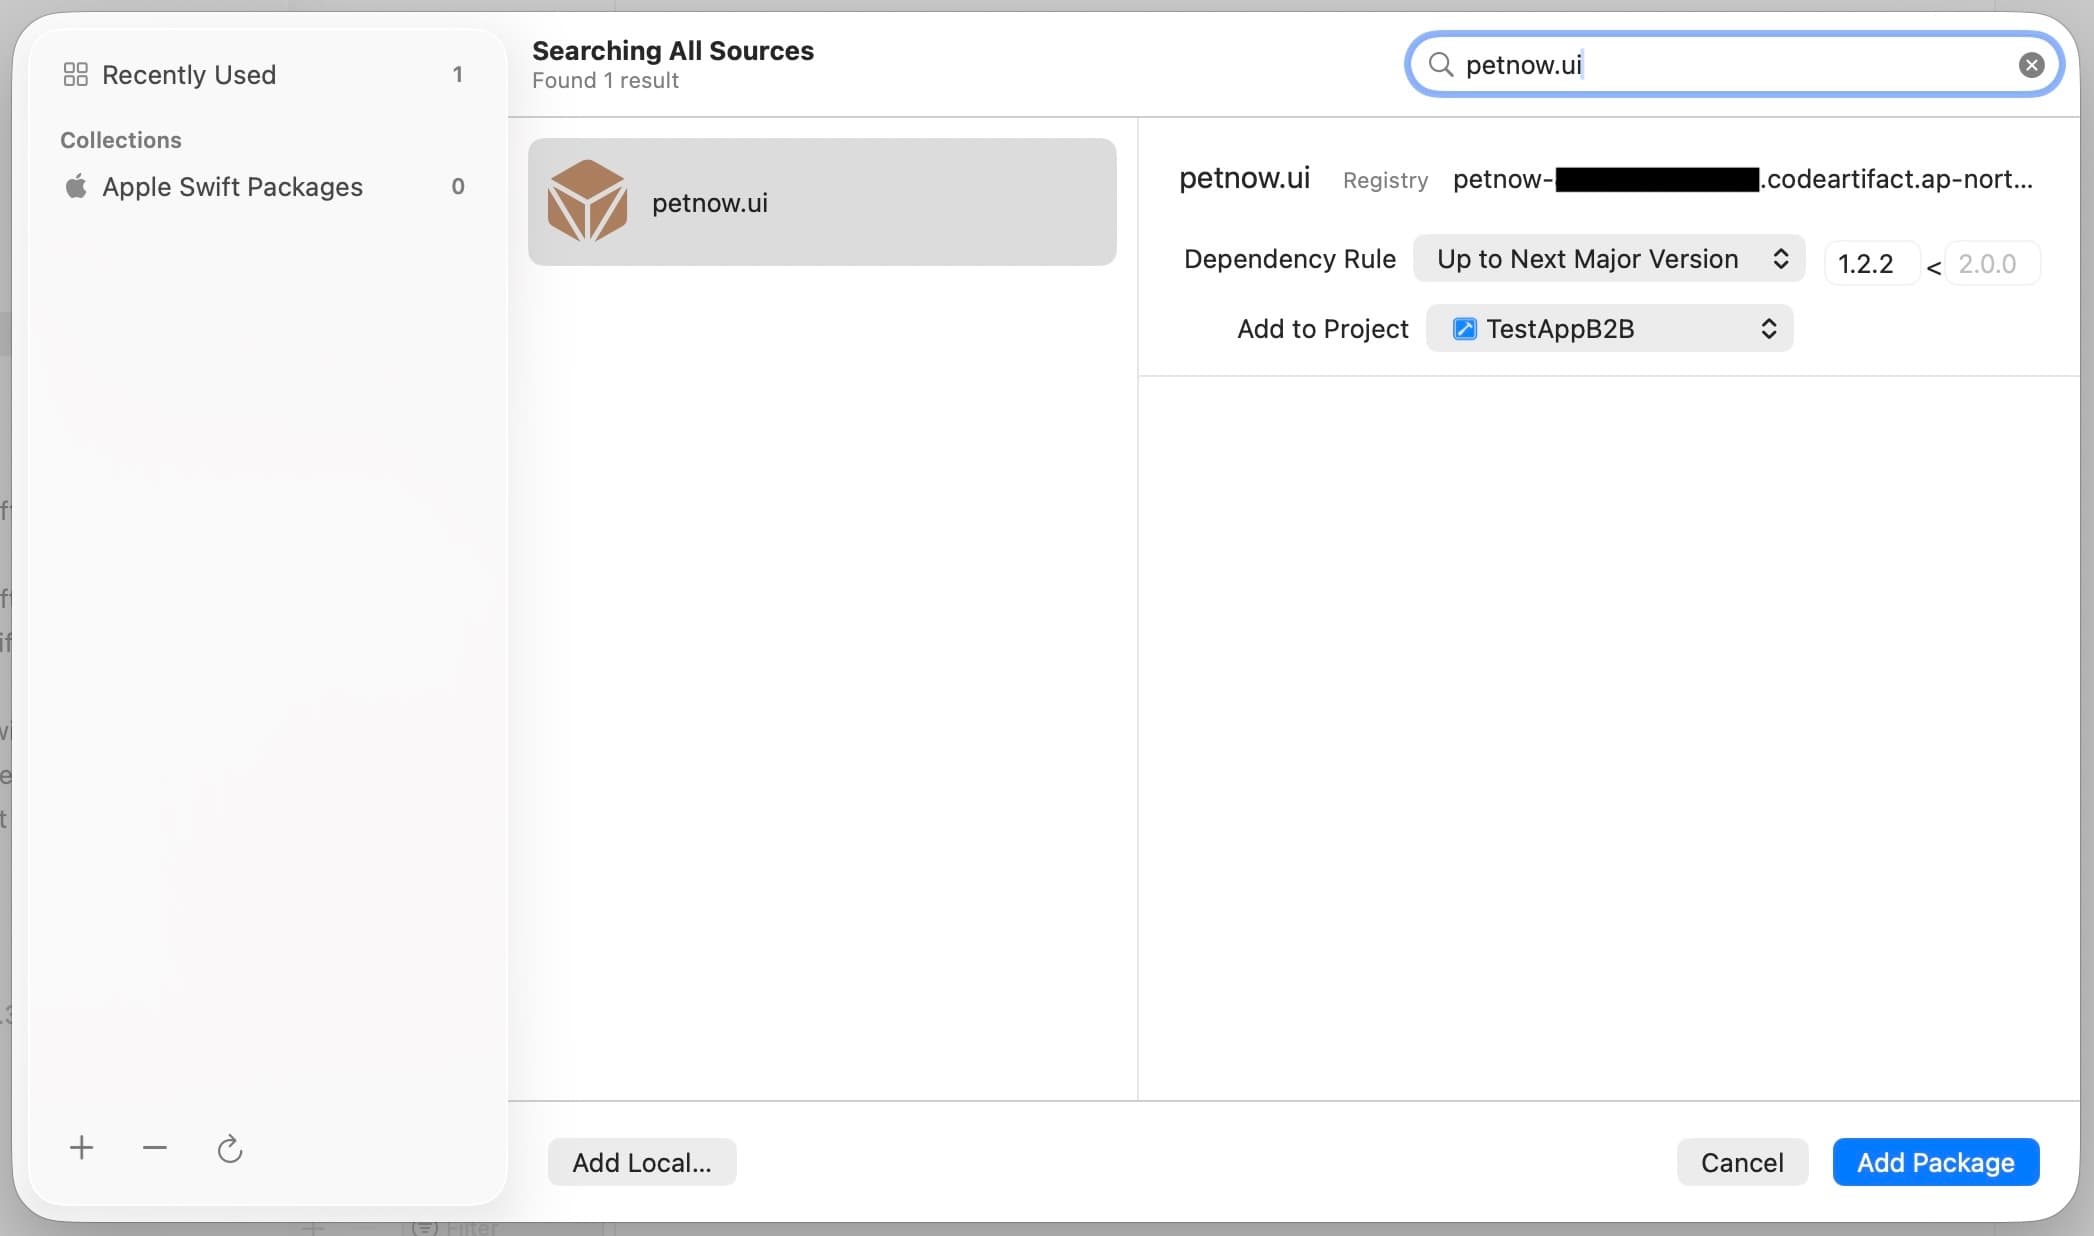
- Open your project in Xcode
- Select File > Add Packages...
- Search for the
petnow.uipackage in the configured CodeArtifact repository - Click Add Package
Important: After typing the package name, you must press Enter. If you don't, the search won't run.
Verify the installation
Once the package is added successfully, you can confirm it in the Package Dependencies section of the project navigator.
Step 2: Configure the project
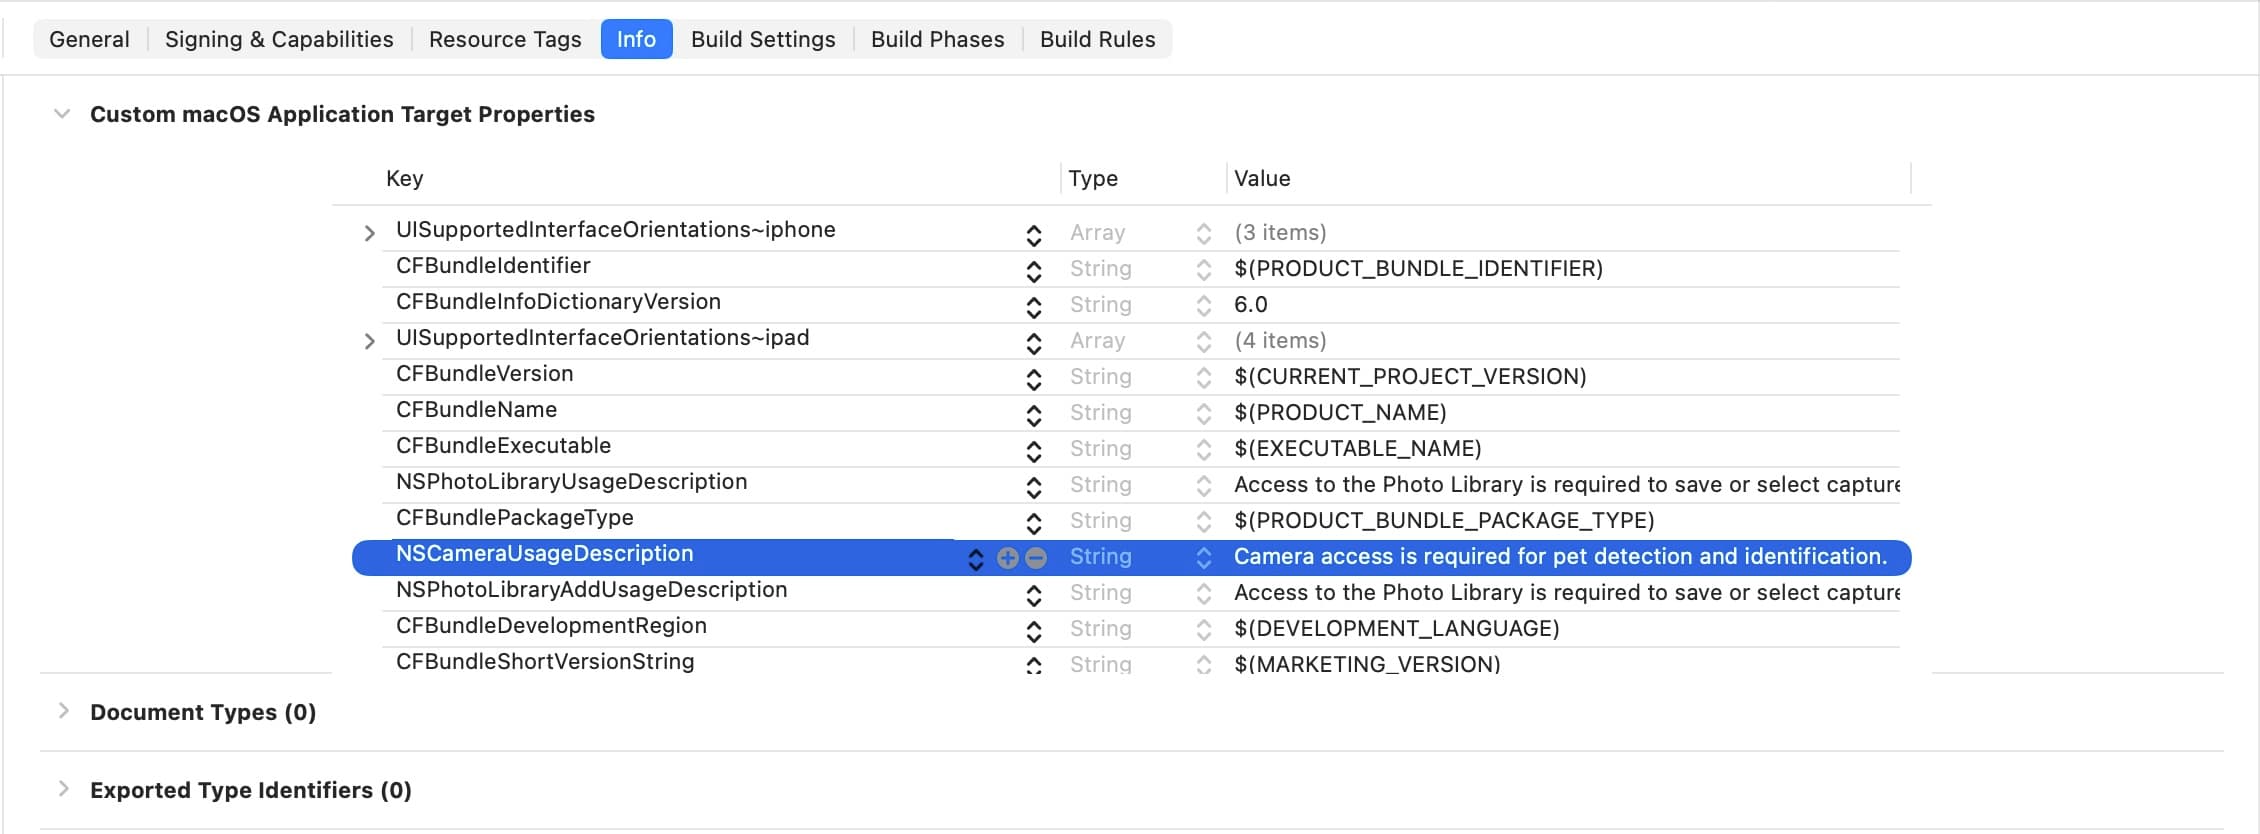
Add Info.plist permissions
For the SDK to use the camera, you must add a permission description to your Info.plist.
Add the "Privacy - Camera Usage Description" or "NSCameraUsageDescription" key, and enter a string explaining why the camera is used.
Required permissions
<!-- Camera access permission (required) -->
<key>NSCameraUsageDescription</key>
<string>Camera access is required to detect and identify pets.</string>Important: Without a permission description, the app will crash when accessing the camera.
Import the module
import PetnowUIStep 3: Create a capture session
Required: Before initializing the camera, you must create a capture session on your server and obtain a captureSessionId.
// Obtain the captureSessionId from your server
// (the server calls createCaptureSession in the Petnow Server API)
let captureSessionId: UUID = await yourServerAPI.createCaptureSession(
    species: "DOG",
    purpose: "PET_PROFILE_REGISTRATION"
)
Server API: The captureSessionId is created on your server through the Petnow Server API. It is not created directly on the client.
Creating the capture session is your app server's responsibility (the client only uses the issued captureSessionId). The petId requirement depends on the purpose (required for registration/verification, not required for identification). For the creation parameters, the petId requirement, and the full server flow through result-image upload, see Server API – Biometric.
For more on session concepts, see the UI Module Overview.
Step 4: Initialize the camera
Initialize the camera with PetnowUI's CameraController. Pass the capture settings (DetectionConfiguration) and the API key (LicenseInfo) to the controller's initializer, then call initializeCamera afterward.
import SwiftUI
import PetnowUI

struct PetCameraView: View {
    @StateObject private var controller: CameraController
    private let captureSessionId: UUID  // the session ID received from the server

    init(captureSessionId: UUID) {
        self.captureSessionId = captureSessionId
        _controller = StateObject(wrappedValue: CameraController(
            configuration: DetectionConfiguration(
                species: .dog,                    // .dog or .cat
                purpose: .petProfileRegistration  // .petProfileRegistration / .petVerification / .petIdentification
            ),
            licenseInfo: LicenseInfo(apiKey: "YOUR_API_KEY", isDebugMode: false)
        ))
    }

    var body: some View {
        CameraView(controller: controller)
            .task { await initializeCamera() }
    }

    private func initializeCamera() async {
        do {
            try await controller.initializeCamera(
                initialPosition: .back,
                captureSessionId: captureSessionId
            ) { result in
                switch result {
                case let .success(fingerprintImages, appearanceImages):
                    // Arrays of local file:// URLs — upload to your app server
                    print("Capture complete: fingerprint \(fingerprintImages.count), appearance \(appearanceImages.count)")
                case .fail:
                    print("Capture failed")
                }
            }
        } catch {
            print("Camera initialization failed: \(error)")
        }
    }
}
DetectionConfiguration / LicenseInfo
DetectionConfiguration(species:purpose:enableFakeDetection:difficultyMode:)— capture settings.purposeis aDetectionPurpose(.petProfileRegistration/.petVerification/.petIdentification).LicenseInfo(apiKey:isDebugMode:)— the API key. License validation is performed on the server atinitializeCameratime (once per key).
isDebugMode is deprecated. Always pass false.
The previous approach of passing the license via
initializeCamera(licenseInfo:…)is deprecated. As shown above, injectlicenseInfointo the initializer and callinitializeCamerawithout the license argument.
Step 5: Verify the installation
To confirm the SDK is installed correctly, build and run your app.
If camera initialization succeeds, the camera preview is shown. On failure, check the error message:
do {
    // licenseInfo was already passed to the CameraController(configuration:licenseInfo:) initializer above
    try await controller.initializeCamera(
        initialPosition: .back,
        captureSessionId: captureSessionId
    ) { _ in
        print("Capture complete")
    }
    print("Camera initialization succeeded")
} catch {
    print("Initialization failed: \(error.localizedDescription)")
}
Troubleshooting
Package not found (Package Resolution Failed)
Symptom: Xcode shows "package 'PetnowUI' not found" or a similar error
Solution:
-
Check the registry configuration
# Xcode Workspace project
cat YourApp.xcworkspace/xcshareddata/swiftpm/configuration/registries.json

# Package.swift project
cat ~/.swiftpm/configuration/registries.json
If the file is missing or empty, log in again from the project root:
cd /path/to/YourApp # the directory containing the .xcworkspace file aws codeartifact login --tool swift \ --domain $PETNOW_CODEARTIFACT_DOMAIN \ --domain-owner $PETNOW_AWS_ACCOUNT_ID \ --repository $PETNOW_IOS_SDK_REPOSITORY -
Check for token expiration
- Tokens expire after 12 hours
- Run the
aws codeartifact logincommand again
-
Clear the Xcode cache
# Clear the SPM cache
rm -rf ~/Library/Caches/org.swift.swiftpm
rm -rf ~/Library/Developer/Xcode/DerivedData

# After restarting Xcode, File > Packages > Reset Package Caches
Missing registry configuration (Xcode Workspace)
Symptom: Xcode can't find the package even after logging in
Cause: aws codeartifact login --tool swift stores the configuration only in ~/.swiftpm/, so the Xcode Workspace doesn't recognize it
Solution: Perform the registry configuration copy from Option B
# Copy into the Xcode Workspace
mkdir -p YourApp.xcworkspace/xcshareddata/swiftpm/configuration
cp ~/.swiftpm/configuration/registries.json YourApp.xcworkspace/xcshareddata/swiftpm/configuration/
Camera permission error
Symptom: The app crashes or no permission prompt is shown
Solution: Verify that NSCameraUsageDescription is added to Info.plist
API key error
Symptom: Authentication error during camera initialization
Solution: Verify that the API key is correct and contact the Petnow team
Next steps
Installation and setup are complete! You're now ready to use the SDK.
- UI Module Overview - Understand the UI module structure
- Basic Usage - Integrate the camera UI
Support
If you run into problems during installation, contact support@petnow.io.